How to Create a Client Dashboard in Clickup for Your VA business
Published 2023-02-20
After starting your VA business, now it's time to learn how to create a client dashboard in ClickUp. Of course, your client wants a one-stop location to get all their project-related updates. ClickUp allows you to organize the client's docu
After starting your VA business, now it's time to learn how to create a client dashboard in ClickUp.
Of course, your client wants a one-stop location to get all their project-related updates. ClickUp allows you to organize the client's documents, provide updates, and posts their tasks on the portal.
Whether it's your first client or you’re switching to the[ ](https://clickup.com/?fp_ref=marie85)[_ClickUp_](https://clickup.com/?fp_ref=marie85) project management tool, you can now take advantage of all these benefits. You will be shocked at how easy it is to create a client dashboard yourself.
Source:[ ](https://www.youtube.com/watch?v=boziUvrXKHI&list=PL5FxPCqd8vgNUPPqcM_vb5dVkRbZffinB&ab_channel=TheRoyalAdvisory)[_The Royal Advisory_](https://www.youtube.com/watch?v=boziUvrXKHI&list=PL5FxPCqd8vgNUPPqcM_vb5dVkRbZffinB&ab_channel=TheRoyalAdvisory)
**What is a Client Dashboard, and Why Do You Need to Create One?**
A client dashboard is an easy-to-use project management tool that allows clients to access and interact with your business and their projects on a single platform. A client dashboard is not that different from an online[ ](https://www.royalassistants.com/post/5-benefits-of-building-your-own-client-portal)[_client portal_](https://www.royalassistants.com/post/5-benefits-of-building-your-own-client-portal).
Creating individual dashboards for your respective VA clients offers them more control over their projects. The more authority your client has over their project, the lower the likelihood of conflicts.
Think about it. Your client will have access to the various tasks they assign you at the working progress stage. Therefore, any changes they want to be made can be done early into the project before much progress is made. Now that's fair compared to completing a long project and having the client make you repeat most of it with recommended changes.
[_ClickUp client dashboards_](https://clickup.com/?fp_ref=marie85) also come with a customization advantage. Users can customize features like the dashboard layout and widget. Such customization freedom is also ideal for allowing clients to personalize their space. It may seem simple, but it is suitable for increasing customer engagement.
**Important Features in a Client Dashboard**
It is easier to know how you create a client dashboard when you know the various sections contained in the dashboard.
**Text Blocks**
It is the section you use to share documents, resources, videos, and ClickUp templates. You can also share support contacts, travel details, and other project materials with your clients.
It is the section where a client can share all the materials they feel are relevant to the task.
**Chat Boxes and Buttons**
The best part about having ClickUp as a project management tool in your[ ](https://www.royalassistants.com/post/how-to-pivot-your-virtual-assistant-business-in-times-of-crisis)[_VA business_](https://www.royalassistants.com/post/how-to-pivot-your-virtual-assistant-business-in-times-of-crisis) is that there is no limit to your conversations. The chat boxes ensure this.
They provide the client with ample space to provide feedback on the projects you are handling for them. The client can also share important work materials here.
You will appreciate the simplicity and efficiency of communication offered by Chat boxes. Because with chat boxes, your conversations with the clients are continuously flowing. Therefore, keeping track of your conversations with the clients is easier.
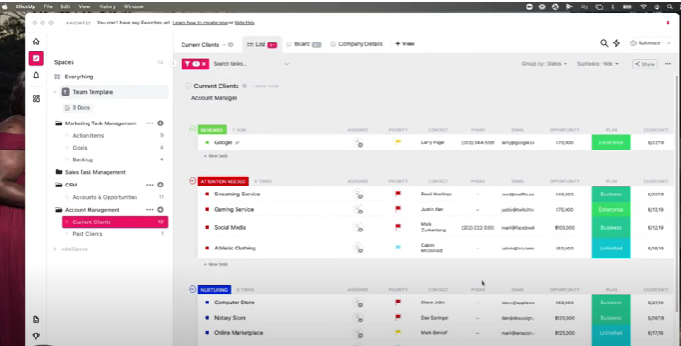
**Task List Widget**
There are times when you will be working for several clients, each with numerous tasks. Therefore, it helps to have a central location where you and the client can view the tasks in progress.
The list will enable the client to prioritize tasks based on their needs. On the other hand, you will agree on project deadlines and when clients can expect updates on the various tasks.
Now let's get to the business end and set up the client dashboard.
Note: You can also watch more about[ ](https://www.youtube.com/watch?v=boziUvrXKHI&list=PL5FxPCqd8vgNUPPqcM_vb5dVkRbZffinB&ab_channel=TheRoyalAdvisory)[_how to create your client dashboard_](https://www.youtube.com/watch?v=boziUvrXKHI&list=PL5FxPCqd8vgNUPPqcM_vb5dVkRbZffinB&ab_channel=TheRoyalAdvisory) on our YouTube channel.
**Step 1: Visit the Dashboard Tab on ClickUp**

Source:[ ](https://www.youtube.com/watch?v=boziUvrXKHI&list=PL5FxPCqd8vgNUPPqcM_vb5dVkRbZffinB&ab_channel=TheRoyalAdvisory)[_The Royal Advisory_](https://www.youtube.com/watch?v=boziUvrXKHI&list=PL5FxPCqd8vgNUPPqcM_vb5dVkRbZffinB&ab_channel=TheRoyalAdvisory)
Remember that you are creating a unique[ ](https://clickup.com/blog/dashboard-examples-in-clickup/)[_client dashboard_](https://clickup.com/blog/dashboard-examples-in-clickup/). So, the first thing you do is visit the ClickUp dashboard tab and expand it. Click the plus (+) sign next to 'my dashboard' to add a new client dashboard.
Once you do this, you will be presented with two options for creating a client dashboard:
- Creating using a template
For this discussion, we will focus on building the dashboard from scratch. So once you select this option, the system will prompt you to choose the widget you would want to add to the client's dashboard as follows:
You can always add more widgets later using the _add widget_ button on the top right.
**Step 2: How to Create Your Chat Widget**
From the widget options offered, as shown in the image above, select the _Chat Widget_. All you need to do after this is select a creative name for your chat widget and click the _Add widget_ button on the bottom right-hand corner.
That effectively creates a chat room where you can communicate with your VA client. Anyone you add to this chat room will get notifications whenever a member chat room member initiates a
**Step 3: Create a Task List Widget**
Another widget you can create for your virtual assistant business client dashboard is a task list. You can create this widget using either the _Task List Widget_ or the _Embed Widget_ option.
The difference is that one offers your client access to other parts of your ClickUp. You will select the embed widget option if you want to restrict the client's access to their dashboard only. On the other hand, the task list widget allows the VA client access to other ClickUp workspaces.
Once you choose your preferred option, fill in the option that will prompt on your screen. Remember to assign a creative name to this widget and add a filter if you only want to show tasks assigned by your client. Finally, click the _Add Widget_ button at the usual bottom right-hand corner to complete creating your widget.
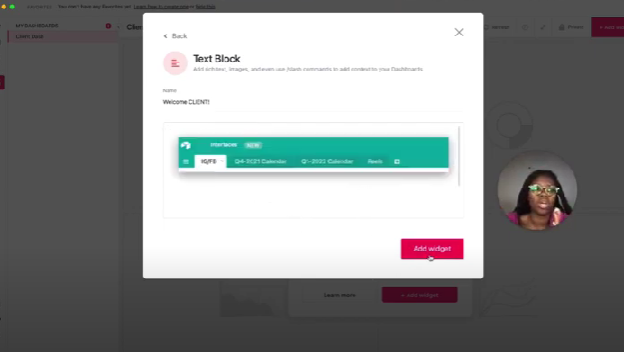
**Step 4: Create Text Widgets**
Source:[ ](https://www.youtube.com/watch?v=boziUvrXKHI&list=PL5FxPCqd8vgNUPPqcM_vb5dVkRbZffinB&ab_channel=TheRoyalAdvisory)[_The Royal Advisory_](https://www.youtube.com/watch?v=boziUvrXKHI&list=PL5FxPCqd8vgNUPPqcM_vb5dVkRbZffinB&ab_channel=TheRoyalAdvisory)
It is the easiest of all the widgets to add. Again begin by selecting the _Text Block Widget_ from the widgets list.
It is considered easy to create because you don't need any more information. Once you have selected the widget, hit the _Add Widget_ button, and you have created your text block widget. You can add as many text blocks as you want by redoing these two steps for the many blocks you want to create.
**Access More Tips on How to Customize Your Client Dashboard**
Congratulations on finally creating a dashboard for your VA client. But you can customize the dashboard further to make it more personal for your client. Find out how by joining the[ ](https://hello.dubsado.com/public/form/view/6114460b418c01945c0ac363)[_Royal VA Community_](https://hello.dubsado.com/public/form/view/6114460b418c01945c0ac363) today.
← Back to the Journal · Royal Assistants