How to Set Up SuiteDash for Your Business: A Step-by-Step Guide
Published 2023-06-12
I set up SuiteDash for my business, and it’s helped me become so efficient that I’d love to show you how to set up Suite Dash so you can enjoy the benefits this CRM has to offer. With SuiteDash, you can finally forget about learning how to
I set up SuiteDash for my business, and it’s helped me become so efficient that I’d love to show you how to set up Suite Dash so you can enjoy the benefits this CRM has to offer. With SuiteDash, you can finally forget about learning how to use or implement several systems in your business.
Most importantly SuiteDash helps you streamline business automation systems. The CRM integrates with most of your automation tools and business capabilities. Therefore, you no longer have to use numerous automation tools to get things done.
SuiteDash perfectly fits the Swiss army knife metaphor. Enough of the chit-chat; let's get down to setting up SuiteDash.
**First Assess Your Business Needs and Goals**
Just because every other business owner uses SuiteDash doesn't mean you need it too. Instead, your business needs should drive you to choose SuiteDash. For example, the need to automate and increase efficiency in managing customer relationships.
[_SuiteDash_](https://suitedash.com/#_r_royalassistants) is also an ideal tool for your email marketing campaigns. The tool improves email marketing automation capabilities through drip campaigns and customization features.
You must also set business process improvement goals you hope to accomplish using SuiteDash. For example, you can measure how much using SuiteDash contributes to improving your email marketing ROI. Such performance metrics will motivate you to exploit all the SuiteDash features that may benefit your business.
**Choose the Right SuiteDash Plan**
It is good that you have established your business needs and the business goals you hope to accomplish by using SuiteDash. Now you won't have trouble choosing the SuiteDash plan to help you achieve these goals.
[_SuiteDash_](https://www.royalassistants.com/post/what-is-suitedash-amp-how-to-use-it-in-your-business) has three major subscription plans; Start, Thrive, and Pinnacle. The following is a comparison of the plans and their features.
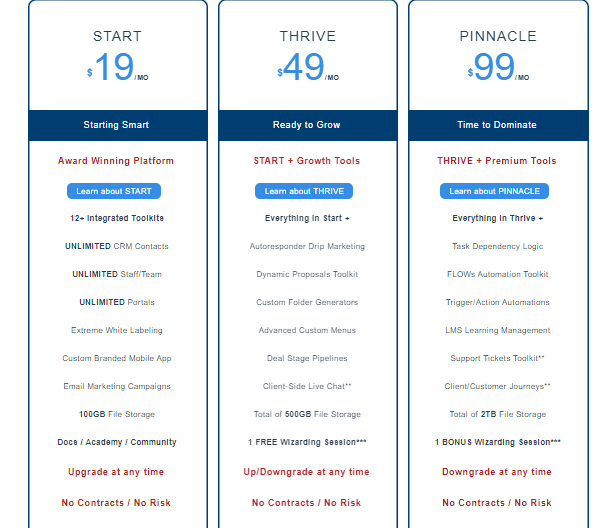
Source:[ ](https://suitedash.com/#_r_royalassistants)[_SuiteDash_](https://suitedash.com/#_r_royalassistants)
Hot Tip: SuiteDash offers a 14-day trial once you subscribe to their tool. Take advantage of this period to try all its features so you can understand its capabilities.
**Create Your Account and Onboarding**
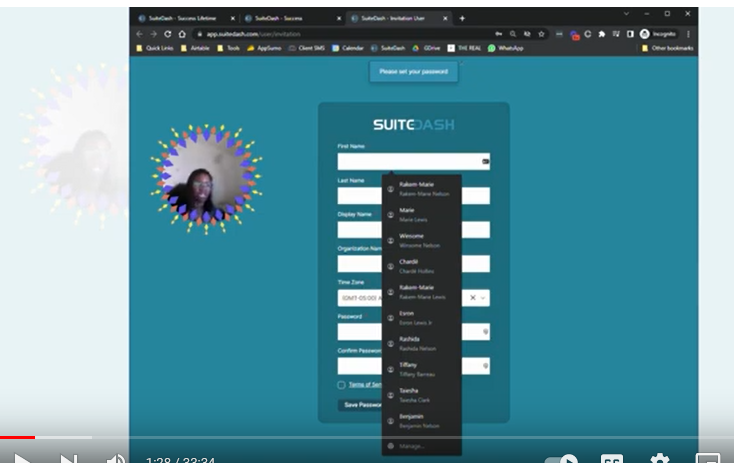
You will only be required to provide your email, where a confirmation link will be sent. Clicking on that link will redirect you to a page where you will fill in your details to set up your page. The page should look something like this:
Once you have finished filling in these details, you will immediately be directed to the dashboard where your startup and customization journey begins. You can see what[ ](https://www.youtube.com/watch?v=26u-kdveyy8&ab_channel=TheRoyalAssistant)[_my dashboard_](https://www.youtube.com/watch?v=26u-kdveyy8&ab_channel=TheRoyalAssistant) looks like before I begin my customizations.
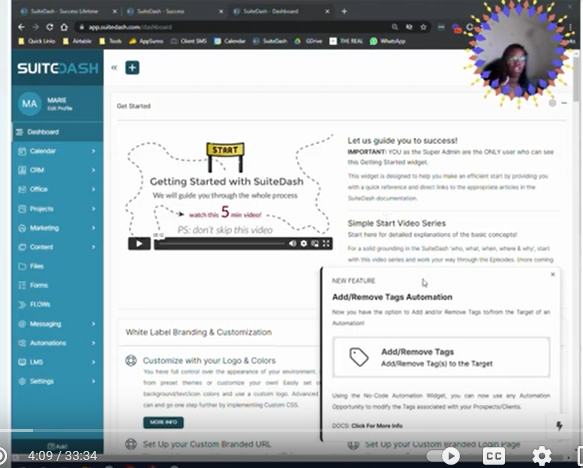
If you are already at this stage, pour yourself that beverage because we are about to get to the fun part of customizing your SuiteDash.
**Customize Branding and Appearance**
Please put on your creativity hat because there is no limit to the level of customization you can do, thanks to their white-label feature. SuiteDash allows you to personalize everything on your page, including creating a customized URL.
The trick to customization is not doing everything at once. You may not have everything figured out. But gradually, you will get an idea of your page's appearance.
Therefore, start by customizing your dashboard widget. Edit your profile to include a photo of your[ ](https://www.youtube.com/watch?v=26u-kdveyy8&ab_channel=TheRoyalAssistant)[_business logo_](https://www.youtube.com/watch?v=26u-kdveyy8&ab_channel=TheRoyalAssistant). The next thing you should do is arrange the dashboard widgets into your preferred layout.
First, set the dashboard setting into edit mode. Then engage in the process of dragging the widget you want to arrange and drop it at the place you want it. Once you have finished arranging the widgets, click the save button for the changes to take effect. Later click the _close widgets list_ to exit the edit mode.
Hot tip: apply your brand colors to the SuiteDash background and dashboard for more effective personalization. It helps creates consistency in your branding.
**Customize User Roles and Permissions**
We are now getting to the part where you delegate tasks and manage your staff members on SuiteDash. To customize the user roles, head to the 'manage staff' option in the flyout menu. Then click navigate to options and select _edit_.
The following are the roles you can assign to your users on SuiteDash:
- Super Admin – it is the user who owns the license for the SuiteDash account. As the Super Admin, you have full authority over your account, including assigning roles to other users.
- Admin – the user has access to the entire platform and can perform all actions in the account except editing the 'manage account menu' or editing the Super Admin's details. You can create this user if you have an online business manager assisting in your business's operation management.
- Office manager – has admin-level access to projects and CRM portions of the platform. However, their access level is limited in other sections of the account.
- Teammate – the user only has access to the projects menu.
- Freelancer – similar to a Teammate role, the user can access the projects menu. However, they cannot access the team talk menu within the assigned projects.
Note: you can edit the roles and permissions later depending on how you prefer to coordinate your team.
**Set up Project Management**
One of the primary goals of setting up SuiteDash is to increase efficiency in project management. Therefore, you need to set up your project management dashboard to allow you to achieve this objective.
You will need to configure your project[ ](https://www.youtube.com/watch?v=vgK_nOnO4nU&ab_channel=TheRoyalAssistant)[_dashboard setting_](https://www.youtube.com/watch?v=vgK_nOnO4nU&ab_channel=TheRoyalAssistant) to enable it. You just have to find your way to the project widget on the dashboard and then the project dashboard settings to enable it.
You need to configure client settings as they’re critical. The first thing you ought to do is personalize the client dashboard by including their business logo and also include a welcome message. Enable the following necessary settings on the client dashboard:
- Display project progress to a client
- Display the project status to the client
- Allow the client to access project files
- Allow client to upload files
- Display the project updates to your clients
**Customize Email Marketing**
You can use SuiteDash to improve your email marketing ROI. But first, you need to configure and customize your email setting to enhance efficiency.
Configuring your email settings includes deciding whether to use SMTP from a third-party email-sending service or request a dedicated IP address from SuiteDash. These are important settings to send drip sequences or email marketing campaigns from your marketing menu.
Moreover, you will need a target audience for your email marketing campaign. You can build your contact list from scratch or import them from a CSV or SRM file.
Drip sequences are messages sent to your contacts after subscribing to be your audience automatically. The sequences help you automate your email campaigns. All you have to do is schedule the emails and define after what cycle they will be sent to your target audience.
To[ ](https://help.suitedash.com/article/347-marketing-drip-sequences)[_create a drip sequence_](https://help.suitedash.com/article/347-marketing-drip-sequences) , navigate to the marketing widget and select audiences on the drop-down menu. Once you get to this page, click the Drip Sequence tab and the _+Drip_ button to set up your email sequence.
**Integrate External Tools and Platforms**
Integrating external tools and platforms with SuiteDash helps improve your business process efficiency. You can integrate tools like Zapier, Quickbooks Online, Zoom, and Slack into SuiteDash.
To integrate Zapier, navigate to the Flyout Menu and select integrations. Please proceed to the Zapier section and click the _Use our Zapier integration_ button. You will then be directed to the SuiteDash landing page on the Zapier website to continue with the integration process.
However, the process may not be that straightforward for all the other integrations. You may have to use[ ](https://help.suitedash.com/article/550-secure-api)[_secure API_](https://help.suitedash.com/article/550-secure-api) to complete the integration process.
**Need Help Setting Up Your SuiteDash?**
You can see that setting up and customizing your SuiteDash may be a bit technical. See the full video of[ ](https://www.youtube.com/watch?v=26u-kdveyy8&ab_channel=TheRoyalAssistant)[_how I set up SuiteDash_](https://www.youtube.com/watch?v=26u-kdveyy8&ab_channel=TheRoyalAssistant) on my YouTube channel here.
← Back to the Journal · Royal Assistants